Wednesday, 29 January 2014

January Week 5 layout for Being Scrappy...

Morning Everyone!

This week I am using the final selection of papers from this month's Being Scrappy Kit, 'Polka Dot Party' from American Crafts. Even though the papers are quite girly I used a photo of Lee and his godson Oscar and I think they work really well!


I used the pink Bazzill as the base for my layout.

Cut two 10" x 1.5" pieces of the butterflies 'Fantastic Favours' and stick down approx. 2" from the top and bottom of the layout. Leave an opening approx. 4.5" wide at the top right so that you can pop a tag in.

Cut out the large journaling card from the 'Fantastic Favours' paper, punch a hole in one end, cut the corners off into a tag shape and attach some twine (from my own stash).

Next cut two 1" x 6" strips of the chevron 'Flourishing Flowers' and stick down on either side of the layout approx. 0.5" in from each edge, and 3.25" from the bottom edge.

Cut a 10.25" x 6" piece of the white 'Dazzling Decor'  paper, punch a note paper edge in one of the long edges and stick down.


Next cut 10" x 5.75" piece of the floral 'Flourishing Flowers' paper and layer up over the other papers.

I then added the die cut card that comes with Kit (Favourite) as I wanted to use it as part of the title.

Add one of the patterned border strips.

Mount a 6.5" x 4.5" photo onto a piece of the white 'Dazzling Decor' paper and stick down.


Take the tag that you prepared earlier, add your journaling and then tuck the tag into the opening in the top of the butterfly paper.


Embellish the layout with the matching stickers.


Add a title using the Thickers Alpha that come with the January Kit.


Pop on over to Niki's blog to see the two layouts that she has come up with this week. You can buy the Kit here for a limited time!

Thanks for looking!
Kirei x


Wednesday, 22 January 2014

January Week 4 layout for Being Scrappy...

Morning Everyone!

This week I am using the 'Cut & Paste' papers by My Mind's Eye from the January Being Scrappy Kit. I had a lovely photo of Lee's brother Chris with his new baby son Ralph.


Use the spotty 'Hey You' paper as the base for the layout.

Cut an 8" x 8" piece of the 'Bliss' paper, ink the edges and stick down down in the centre.

Next cut a 11" x 1.5" strip of the 'Smile' paper, ink the edges and stick down just above the bottom of the 'Bliss' piece.


Now cut a 7.5" x 5" piece of the clouds 'Bliss Delight' paper, cut a banner into one end, ink the edges and stick down.


Ink the edges of the journaling card and stick down to the right side of layout.


Attach your 7" x 5" photo.


Cut some strips of the 'Bliss Jovial' paper and use these for your journaling.


Add a title using the Thickers Alpha that comes with the Kit. I used a mini alpha from my own stash as well. I also addes some of the little square crosses from the Thickers Alpha.


Have a look at Niki's blog to see the two layouts she has designed this week. The Being Scrappy January Kit is available here for a limited time.

Thanks for looking!
Kirei x

Wednesday, 15 January 2014

January Week 3 layout for Being Scrappy...

Morning Everyone!

This week for Being Scrappy I'm using the 'Hello Again' papers by Carta Bella, very pretty sorbet colours with touches of navy and garden green. I used one of our wedding photos as it was a perfect match...


Cut a 6.5" x 10.5" piece of the 'Triangles' paper and then cut a 5.5" x 5.5" square out of one end leaving a 0.5" border.

I used the large chevrons side of the Hello Chevron' paper as the base for my layout though I did gut a 6" x 6" piece from the left side. Use the 'Triangles' piece already cut to work out where to gut.

Take the piece of spotty 'Hello Chevron' paper and stick this down over the hole in the layout base.

Crop a photo down to 5" x 4" and stick down on a slant and then stick the 'Triangles' piece (with a hole cut out) over the photo.


Add one of the journaling cards from the 'Journaling Cards' paper and add some of the stickers from the 'Hello Again' sticker sheet that comes with the Kit.


Finish off with some journaling and a title (I used some alphas from my own stash).


Have a look over at Niki's blog to see the two layouts that she has designed this week... To purchase this month's fab Kit click here to find out all about how to sign up.

Thanks for looking!
Kirei x


Monday, 13 January 2014

Document 2013 - November

Morning Everyone!

Finally back up to date! Here is my November Document 2013 layouts.

The November calendar layout...


The divided plastic pockets...


My November main focus layout...


I have my final class to complete the Dec layout on the 11th so will post the final Document 2013 layouts after that.

Thanks for looking!
Kirei x

Wednesday, 8 January 2014

January Week 2 layout for Being Scrappy...

Hi Everyone!

Doesn't it feel like Christmas was ages ago already... took down all the decorations last weekend and really missing the festive feel!

Anyway this week's layout for Being Scrappy is very much Christmassy to tie in with the 'Vintage Christmas' papers from My Mind's Eye. I used some pics taken last year, of Lee's mum and dad's decorations.


Use the kraft Bazzill for the base, but gut a 9.5" square from the centre.

Then cut an 11.5" x 11.5" piece of the 'Red Damask' paper and stick to the kraft Bazzill frame.

Next cut the 'MERRY' glitter word from the 'Merry' paper and put to one side.

Cut a 5" x 10.5" piece of the chevron 'Merry' paper and stick down to the left side of the layout.

I used six photos and cropped them down as follows:

a) 3.25" x 4.75" and 4" x 4" - these can be stuck down onto the left side.
b) 3" x 4.5" - mount onto the chevron 'Merry' paper and stick down to the right side approx. 3.75" from the bottom.
c) 6" x 3.25" - mount onto kraft Bazzill and stick down in the centre approx. 1.75" from the top.
d) 2.5" x 3" - mount onto kraft Bazzill and stick down to the upper right side overlapping the other photo.
e) 3" x 4" - stick down at the bottom of the layout in the middle.


I added some of the snowflake washi tape that comes with this month's Kit.


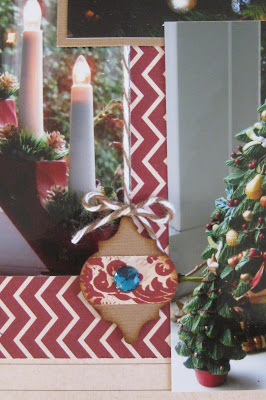
To embellish I made some Christmas baubles using a Stampin' Up! punch, ink the edges, stick a length of striped twine to the back and then stick down (I used foam pads on some to raise them up). Add some of the coloured jewels from this month's Kit and a twine bow to finish them off!


Stick down the glitter 'MERRY' strip (I inked the edges first). I added 'Christmas' using the Glitz alpha that came with the December Kit.


Finish off with some journaling in the bottom right corner.


To see some other layouts made with the January Being Scrappy Kit pop on over to Niki's blog and to purchase the Kit click here.

Thanks for looking!
Kirei x


Monday, 6 January 2014

Document 2013 - October

Hi Everyone!

Another Document 2013 layout for you, this time for October.

My October calendar layout...


The divided plastic pockets...


The October main focus layout...


I will be back with November's Document 2013 next week.

Thanks for looking!
Kirei x